|
|
|
|
|
What is Assembly?
An assembly is the primary building block of a .NET Framework application. It is a collection of functionality that is built, versioned, and deployed as a single implementation unit (as one or more files). All managed types and resources are marked either as accessible only within their implementation unit or as accessible by code outside that unit.
There really isn’t VB6 equivalent of an assembly but VB6 exe/dll comes closer to the concept of Assembly but again Assembly can be made of multiple files which makes the comparison inexact.
Why Assembly?
Assemblies are designed to simplify application deployment and to solve versioning problems that can occur with component-based applications.
End users and developers are familiar with versioning and deployment issues that arise from today's component-based systems. Some end users have experienced the frustration of installing a new application on their computer, only to find that an existing application has suddenly stopped working. Many developers have spent countless hours trying to keep all necessary registry entries consistent in order to activate a COM class.
Many deployment problems have been solved by the use of assemblies in the .NET Framework. Because they are self-describing components that have no dependencies on registry entries, assemblies enable zero-impact application installation. They also simplify uninstalling and replicating applications.
Assembly Internals
In general, a static assembly can consist of four elements:
- The assembly manifest, which contains assembly metadata.
- Type metadata.
- Microsoft intermediate language (MSIL) code that implements the types.
- A set of resources.
Only the assembly manifest is required, but either types or resources are needed to give the assembly any meaningful functionality.
There are several ways to group these elements in an assembly.
You can group all elements in a single physical file; alternatively, the elements of an assembly can be contained in several files. These files can be modules of compiled code (generally file extension is “.netmodule” ), resources (such as .bmp or .jpg files), or other files required by the application. Create a multifile assembly when you want to combine modules written in different languages and to optimize downloading an application by putting seldom used types in a module that is downloaded only when needed.

Manifest
Manifest is the most important part of an Assembly. Manifest contains useful information (Meta Data) about an assembly which makes an assembly “self describing”.
The following block diagram will help you to understand manifest.
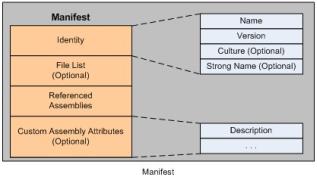
There are four major section of manifest
- Identity
- File list
- Referenced Assemblies
- Custom attributes
IL Disassembler (ildasm.exe)
Visual Studio .Net ships with a tool called “IL Disassembler” (generally located at \ Microsoft Visual Studio .NET 2003\SDK\v1.1\Bin\ildasm.exe). This tool can help you to analyze internals of an assembly. Look at the screenshot of ildasm.exe
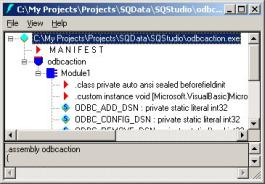
To analyze manifest of an assembly
- Open a .Net assembly in ildasm using File->Open.
- Once assembly is loaded you should be able to see the Manifest on the very top. Double click on the Manifest node.
The following screenshot is a sample manifest of some .net assembly on my machine.
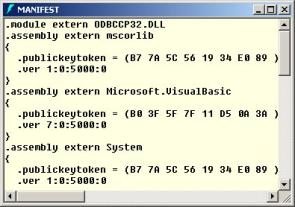
Look at the above manifest and you will realize that what kind of information is stored by .Net Assembly in the manifest section. For example “extern” keyword indicates that external reference used in this assembly. Most of times you will find mscorlib, System, System.Data, System.XML in the external assembly reference list. Manifest contains hash of the public key (.publickeytoken) and version number (.ver) of the external assemblies.
Assemblies and Deployment
So far we have looked at the structure of an assembly. We also learned how metadata stored in the manifest helps to keep track of some useful information and now we will see how this metadata helps to eliminate versioning issues previously known as “DLL Hell”.
Using Microsoft .Net you can create 2 different types of assemblies
- Private assemblies
- Shared Assemblies
Let’s look at the each assembly type.
Private Assemblies
This type of assembly can be used by only one application and it can not be shared just like COM components. Here are the main characteristics of private assemblies.
- Private assembly is the default style of an assembly in .Net.
- Private assemblies are deployed in the application’s own directory.
- Private assemblies do not need strong name. Minimally they need assembly name and Version Number in the identity section of assembly’s manifest.
- As the assemblies are private to an application no version check is required.
- Since assemblies are “self-describing” no registry entries are required. Entire application folder can be backed up or deployed using simple DOS command like XCOPY (assuming there is no database, shortcuts, message queues etc.).
Shared Assemblies
The second type of assembly in .Net is “Shared Assembly”. This type of assembly can be used by multiple applications on the target machine. For a moment you can think a shared assembly as a COM component which can be registered and then used by applications running on the system but again COM component is not same as Assembly.
All .Net assemblies (i.e. System.Data.dll, System.Windows.Forms.dll etc.) which comes with .Net framework are shred so you can use those assemblies in your project. Here are the main characteristics of shared assemblies.
- Shared Assembly must have a globally unique name which is know as “strong name” just like COM component requires 128 GUID.
- Shared Assemblies are stored in GAC (Global Assembly Cache). Very soon we will see how to register an assembly in GAC using gacutil.exe.
- You can register multiple versions of the same shared assembly in GAC.
Creating shared assembly using VS.net 2003
Let’s look at the steps to create a shared assembly using visual studio 2003
- Create a new class library project in VS.net
- New project should already have Class1.vb file. Write the following code in class1.vb file |
Generating Strong name for shared assembly
Now next step is to create a strong name for an assembly.
Shared assembly must have “Strong name”. Now the question is “what is strong name”. You can think of a strong name as the .NET Framework equivalent of the old COM GUID. They were just 128-bit numbers that were created by a mathematical process that made them unique. But strong names are created using two cryptographically related keys called the public key and the private key. This gives strong names a whole new dimension of capability over the old GUIDs.
So, "An assembly with a strong name has a globally unique name and provides assurance that it hasn't been modified since it was built."
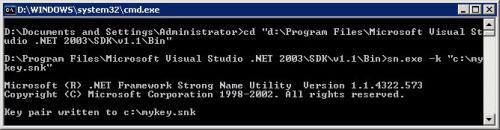
Before you can do any of this cool stuff, you first have to generate public/private key data using the .NET Framework utility: sn.exe. The sn.exe utility will create a file ending with the *.snk (Strong Name Key) file extension. This file contains the values of two mathematically related keys. These are the public key and the private key. The VB.NET compiler can record the full public key value in the assembly manifest.
- Now we will create a public/private key pair using Sn.exe a tool provided with Visual Studio.net to create strong name. Generally sn.exe is located at \Microsoft Visual Studio .NET 2003\SDK\v1.1\Bin.
- Execute the following command at the command prompt |
Once you have created strong name key pair file (*.snk) you have to modify the AssemblyInfo.vb file which is created by default when you create a new Class Library project using VS.net 2003.
Add the following line to create a strong name for your assembly. |
This attribute specify the public/private key pair file which can be used to generate strong name for an assembly.
After this step you can build your project.
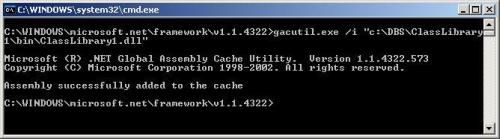
Adding assembly in GAC (Global Assembly Cache)
Once you build your assembly with strong name now its time to add our assembly in GAC (Global Assembly Cache) which is a centralized location to store all shared assemblies.
You can add your assembly in GAC using .net framework tool gacutil.exe. This tool is similar to regsvr32.exe which was used to register COM component.
Run the following command to register your assembly. |
| Note: you can remove the assembly from GAC using the following command |
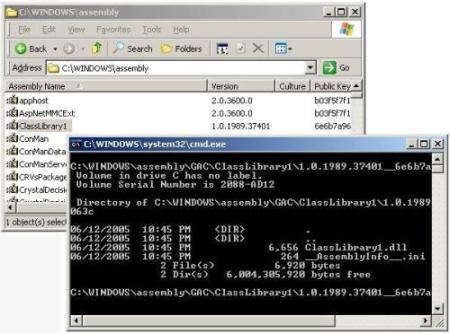
You can check the registered assembly by browsing %Windir%\Assembly folder. Note that this is a special folder so you can not browse subdirectories just like regular windows directory. In order to see all files/subdirectories you have to use command prompt as shown in the following screenshot.
Using Shared Assembly
Ok now its time to use shared assembly in your own application. Let’s create a very simple windows application which references the shared assembly.
- Open Visual Studio.net IDE
- Create a new windows application
- Add one command button on your form
- In the solution explore right click on the “References” node and select “Add Reference…”
- If you don’t see your assembly in the “Add References…” dialog box then you must browse the assembly by clicking brose button. Browse the actual path (mostly "\bin\debug" folder) where your assembly is stored not the GAC path.
Note : By default VS.net IDE shows only those assemblies which are registered in GAC and stored under the paths defined by the following registry key.
"HKEY_LOCAL_MACHINE\SOFTWARE\Microsoft\.NETFramework\AssemblyFolders\"
Under \AssemblyFolders you have to create your own category subkey and then change the default value to assembly folder path. Once you do this next time when you open add reference dialogbox you can see your registered assembly.
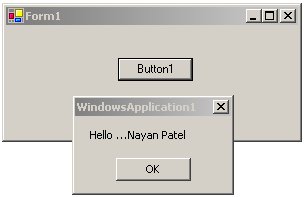
- Once you add the reference to Classlibrary1 type the following code in Button1 click event |
- Now press F5 to run the project and click on the button1
How to force your application to use a different version of an assembly?
.Net made it so easy to configure your application to use different version of an assembly without recompiling your application. You can use applicaion configuration file to achieve this functionality. Here is an example of application config file which binds application (MyApp.exe) with a different version of assembly MyLibrary1.
Note: Application config file is optionla and its only required if you want to change the default settings. Application configuration file name always starts with application name and ends with "config" extension. Configuration file resides in the application folder.
The following config file will force MyApp.exe to use MyLibrary1 version 2.0.0 instead of version 1.0.0
MyApp.exe.config |
configurationruntimeassemblyBindingxmlnsurn:schemasmicrosoftcom:asm.v1dependentAssemblyassemblyIdentitynameMyLibrary1publicKeyToken25e68d84aa9b2449cultureNeutral!Redirectingtoversion2.0.0.0oftheassembly.bindingRedirectoldVersion1.0.0.0newVersion2.0.0.0dependentAssemblyassemblyBindingruntimeconfiguration Conclusion
In this article you learned about “assembly”. You also learned about how assembly makes a huge difference over COM technology. Assembly solves “DLL Hell” and versioning issues using rich Metadata stored in assembly. |
|
|
|
|
|
|
Submitted By :
Nayan Patel
(Member Since : 5/26/2004 12:23:06 PM)
|
 |
|

|
Job Description :
He is the moderator of this site and currently working as an independent consultant. He works with VB.net/ASP.net, SQL Server and other MS technologies. He is MCSD.net, MCDBA and MCSE. In his free time he likes to watch funny movies and doing oil painting. |
|
View all (893) submissions by this author
(Birth Date : 7/14/1981 ) |
|
|